Showing posts with label Configurations. Show all posts

Monday, January 14, 2019

Veritas NetBackup - Step by Step Whitepaper for Configuring VMware Backup Policy

Today i'm going to explain how to configure your VMware integration or backup policy in Veritas Netbackup in a simple and straight way.
This Article provides the step by step process of Netbackup VADP configuration, credentials adding for different Virtual machine servers for Netbackup to enable the Vmware(VADP) backups.

Prerequisites

1.1) Make sure Netbackup Enterprises client license is installed on Master server and media server( in case of traditional based license)
1.2) Define backup host (backup host can be the master or media server also other server)
1.3)  Define the Virtual Machine server that needs to add have the info about the VCenter/Esxihost (name and IP address)
1.4) Verify the bi-directional communication between the Netbackup backup host & Master server to VCenter over the port 443 and ESXi over the port 902
Port 443 Vcenter⇔ Master Server & backup host
Port 902 ESXi ⇔Master Server & backup host
1.5) Get Credential on VCenter for Netbackup to use at the time of backup( if you would like to use the Esxi also for backups get the Credential on ESxi also)

Tuesday, December 11, 2018

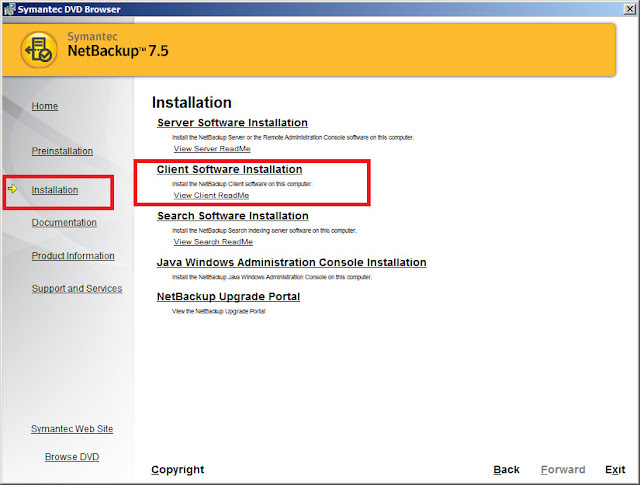
NetBackup: Install Client Software in Veritas NetBackup (Symantec) – Windows OS

NetBackup client must be installed on the computer before creating a backup policy, client software can be installed by locally (CD ROM)  or remotely via network. Here is the small tutorial about installing client on Windows 2003 server.
Run browser.exe from CD ROM or HDD. Setup will start, Select Installation menu, then select Client Software Instillation.
NetBackup: Install Client Software in Veritas NetBackup (Symantec) – Windows OS
Click Next on welcome window.

NetBackup: Create Backup Policy in Veritas NetBackup (Symantec) – Verify Windows or Unix Policy

NetBackup: Create Backup Policy in Veritas NetBackup (Symantec) – Verify Windows or Unix Policy
Backup policy has to be created to backing up the client data over the network, before crating a policy; install Symantec NetBackup 7.5 client on remote machine. While doing the post configuring it might ask you to create data backup policy or you can create new backup policy from admin console.
Backup policy can be created from Admin Console.

Saturday, June 13, 2015

Free Hyper V Configuration Tool by manageengine

Free Hyper V Configuration Tool
Virtual servers provide great cost benefits as opposed to real physical server. This encourages people to run many applications and services on these virtual servers. The application, that is running within the virtual servers need to be running all the time. Sometimes, during emergency situations, few VM's require more resources to manage the demanding, resource intensive applications running on them. In that critical moment, it becomes imperative to allocate more resources, such as CPU, RAM to that VM's. Hence, it is important to monitor and manage those virtual servers(VM's) continuously at all the times
The ManageEngine's Free Hyper V Configuration tool addresses this monitoring and management requirement. The Free software can configure Microsoft Hyper V Virtual server (VM's ) resources such as CPU, RAM or execute Power operations or change the boot order start-up, and also it fetches comprehensive data about the servers and its virtual machines and presents them as visually elegant graphs and reports in a desktop tool dashboard.
Manage Engine Hyper-V Configuration Tool can configure Hyper V Server from the remote location. The best part is that the tool is made available to you absolutely FREE of cost.

Features:
·  Easy to use dashboard tool
·  Hyper V server – CPU , Memory, Disk Monitoring
·  Virtual server (VM) – CPU configuration
·  Virtual Machine (VM) – RAM configuration
·  Power on, Suspend, Power–off VM from remote

Key Benefits
ManageEngine Free Hyper V Configuration Tool provides an exclusive configuration solution for Hyper-V server, a Virtual Machine, running on Windows 2008 R2. Using the free tool, the administrator can increase or decrease the RAM capacity, or allocate more number of CPU processor for the VM, or execute 'power operations' on the Virtual servers like 'power-on' the VM's , suspend the VM's , 'Power Off' the VM and Pause the VM, and it allows the operator to select the Boot-order for each VM', either it may be from Disk, CD Rom, Pxe boot and more.
Tool populates actual resource utilization details of the virtual servers along with CPU usage, Memory details, Disk and Network utilization of each guest operating system. The dashboard quickly shows how many virtual machines are present, how many are powered-on / powered-off or suspended state and displaying its severity as Critical or Warning in a elegant Tree-View, and also, how much CPU are allocated to / consumed by each Virtual Machine etc., in an intuitive bar graph.
The ManageEngine Hyper V Configuration Tool serves as a smart desktop tool that continuously monitors Hyper V, a Microsoft virtual server, across your network and more importantly, it empowers you to manage / configure those VM's in real-time and ensures your mission-critical applications run smoothly.

Download ManageEngine Hyper V Configuration Free Tool 1.0

 3 MB)
Note: Please read and accept the License Agreement before downloading the software


Thursday, November 21, 2013

Gmail via Outlook for Windows and Mac - Step to Step Configuration

Google Mail (GMAIL) via Outlook for Windows and Mac - Step to Step Configuration
Here is another tip for Gmail Users, Now you can configure Gmail in your MS office Outlook with more handy, Our Step by Step Guide will differently help even Beginners/Dummies much easier,

Promotion for India: Check out Online Shopping Deals, Coupon & Lowest Price Products from Our Price Comparison Web Site - http://www.dealdimer.com


  To configure Outlook for Windows so it can retrieve Google Mail: 
  1. In Outlook, choose the File tab.

Tuesday, February 21, 2012

How to Activate GodMode in Windows 7

Want to activate GodMode in Windows 7? Here's how!
Windows 7 users are all abuzz about the OS and its GodMode. If you haven't heard of it, GodMode is a feature that was revealed by CNet's Microsoft Correspondent, Ina Fried. GodMode is a folder that brings together a long list of customization settings allowing you to change all your settings from one place. Neat huh? It's very easy to enable and damn useful if you tweak things around a lot.
I've broken it down into five-step process to avoid confusion:
Step 1: Right click.
Step 2: Click create folder.