Today i'm going to explain how to configure your VMware integration or backup policy in Veritas Netbackup in a simple and straight way.
This Article provides the step by step process of Netbackup VADP configuration, credentials adding for different Virtual machine servers for Netbackup to enable the Vmware(VADP) backups.

Prerequisites
1.1) Make sure Netbackup Enterprises client license is installed on Master server and media server( in case of traditional based license)
1.2) Define backup host (backup host can be the master or media server also other server)
1.3) Define the Virtual Machine server that needs to add have the info about the VCenter/Esxihost (name and IP address)
1.4) Verify the bi-directional communication between the Netbackup backup host & Master server to VCenter over the port 443 and ESXi over the port 902
Port 443 Vcenter⇔ Master Server & backup host
Port 902 ESXi ⇔Master Server & backup host
1.5) Get Credential on VCenter for Netbackup to use at the time of backup( if you would like to use the Esxi also for backups get the Credential on ESxi also)
Just follow the below screenshots to configure vmware backup policy in Symantec Netbackup.
The NetBackup for VMware provides backup and restore of the VMware virtual machines that run on VMware ESXi servers.
NetBackup for VMware takes an advantage of VMware vStorage APIs for data protection. The backup process is off-loaded from the ESXi server to a VMware backup host.
1. Add VMware Vcenter/vcloud Director/VMware ESX server information.

2. Select your Virtual Machine Server Type.

3. Provide the server's user credentials.

4. User name and password once authenticated, then it will add to netbackup master server's virtual machine server.

5. In this example i have added the vcenter server.

6. Same as i have added the VMware ESX server also.

7. Now you can able to see both the virtual machine servers.

8. In Master server host properties add the vmware access hsosts (vmware backup host).

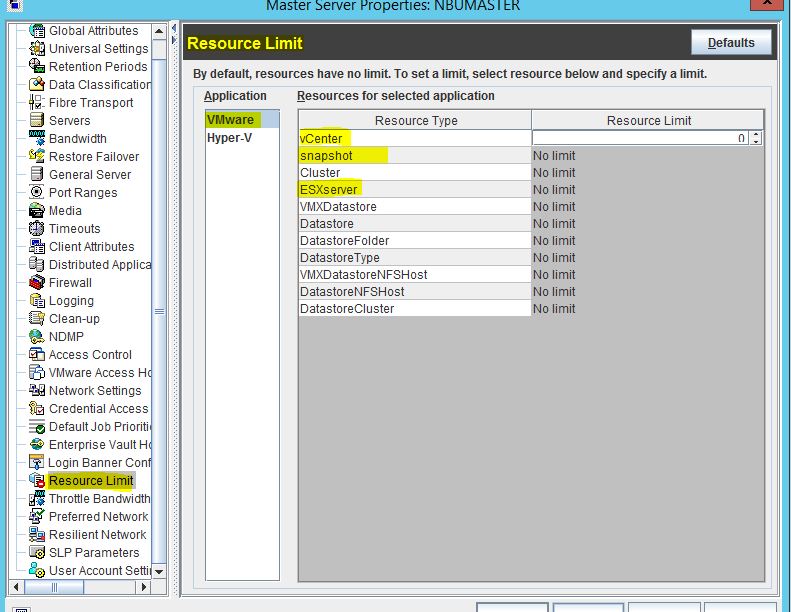
9. You can configure the resource limits also.
10. Now create a vmware type policy using Admin console wizard or CLI.

11. Select your policy type vmware or Hyper-V.

12. Specify the vmware policy name and select the hypervisor type (vmware or hyper-V).

13. Select the policy storage unit.

14. Vmware policy features to configure.

15. Select the advanced features.

16. Then select the virtual machines to backup (automatic or Manually)

17. Select the vm's to backup.

18. Now the vm is added to backup client list.


19. Select the backup types.

20. Select the schedule, frequency and retention levels.

21. Select the backup window.

22. Summary report of policy.

23. Now vmware policy got created.

24. To test run a manual backup.

25. Accessing through vsphere client, the testvm is running.

26. Backup got initiated.

27. It is initiating the snapshot and then backup of vm.

28. Virtual machine backup done successfully.

29. For testing purpose, delete testvm from the ESXserver.

30. Testvm server got deleted.


31. Now we go restore and recover the virtual machine from BAR GUI.
Select your vm backup image.

32. Select your restore options.


33. Test the restore activity and start the restore.

34. Restore activity initiated successfully.

35. Now it is restoring the vmdk files to ESX server data store.

36. Then restoration successfully completed.

37. Now check in the vsphere client, you can able to see the testvm server.

I will always prefer to select VM host using automated selection instead of manual, which you can find from the below screenshot and while selecting the same use Display name to select the VM’s instead of using hostname, because if you use a hostname as a selector sometime you will find a DNS issues. At same time if you have selected the Display name then you should not change it in the VMware Vcenter, if it so then backup will fail due to not able to find the display name selected in the backup policy
Now you have configured the vmware policy to schedule the backup. But please note in vmware policy the important one is transport mode which gives you the good data transfer rate as per to the transfer mode you select. Normally i use in my environment is nbd its nothing but via network.


0 Comment to "Veritas NetBackup - Step by Step Whitepaper for Configuring VMware Backup Policy"
Post a Comment